
Showing posts with label roses. Show all posts
Showing posts with label roses. Show all posts
Tuesday, May 17, 2011
crocheted flower hairclips

Tuesday, March 29, 2011
Roses & Ruffles Lamp Shade - from boring to burlap
So last week I was looking at this boring lamp shade and wondering what to do with it. It'd only been this way for atleast 15 years and I had never decided how I wanted to decorate it. At one point I thought about covering it with buttons but obviously that never happened so there it sat.
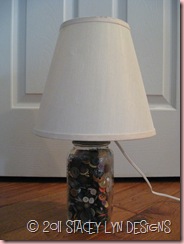 Later that day my friend posted on facebook that she would be sharing instructions to add pleated ruffles to a lamp shade. That got the wheels turning and I googled "ruffled lamp shades" and found several blogs with various ideas on how to add ruffles to lamp shades.
Since I had a yard of burlap and some spare time yesterday I decided to get to work and try it out.


 If you don't have a 1 1/2" marked on your sewing machine, line up your ruler and put a length of masking tape to mark your sewing guide.


Since I had a yard of burlap and some spare time yesterday I decided to get to work and try it out.

First I cut four 3" strips.

I set my sewing machine to the longest straight stitch I could.

Then I sewed down the middle of my fabric strips.


For the top row to help make the ruffle even I marked the middles and fourths with pins and then I pulled the thread to ruffle it and used a glue gun to glue the pinned spots to the right places on the shade and then I glued in between a few times to tack it down.
Then I did the bottom ruffle. It didn't fit all the way around so I cut another strip in half and used that part to finish it. Last, I did the middle ruffle using an additional quarter of a strip to fill in the extra space. (I should have sewed the strips together to make them longer before I ruffled them and used the pins to mark the middles and fourths to make sure they were ruffled somewhat evenly.)
Here is the lamp with just ruffles. This is all I’d planned to do but then since I still had some fabric and I love making roses I decided to add some roses to my lamp shade. I cut the remaining fabric into 3” strips and then cut the strips in half so they were about 30” long each. As I made each rose I just hot glued it directly onto the lamp shade. ( I didn’t sew the roses – just held them in place as I formed then and then glued them down) I would recommend spacing 5 evenly around the top layer and then adding 5 to the next layer in between and then do the bottom row. If you use a tapered lamp shade like mine the roses in the top row will be closer together than the roses on the bottom row.

Close up of one of the roses.

The finished lamp.

Close up of the finished lamp shade.
I love it more and more every time I pass by it. Too bad this is the only lamp shade in the house. I might have to go door to door to find another lamp shade in town that needs a lift…
If I ever do this again…
1. I will follow my mother’s advice and use elastic to ruffle the fabric. (Cut a length of fabric 2 – 3 xs the desired length. Cut a piece of elastic the circumference of the lamp shade. Mark both pieces in half and fourths. Carefully zig zag over the elastic matching up your markings to help the fabric ruffle evenly). Unfortunately I didn’t have any elastic on hand and as far as I know the closest fabric store is 90 miles away in Billings.
2. Use heavy duty thread. My thread broke several times during the ruffling process and I ended up hand threading a needle and weaving the thread through the fabric manually. It was a nightmare believe me. Especially when half the strip of fabric was already glued to the shade and I was trying to ruffle the other half by hand. Yikes!
3. Use a drum shaped lamp shade. Those seem to be the “in” shape of a shade right now and it would make things easier to be consistent with your ruffling and rosette spacing.
If you end up making one of these please let me know and I hope that I’ve provided enough tips to help yours turn out better and take less time than mine did.
Happy crafting!
Linking this post to all the blog parties under the "link parties" tab. Check them out!
Monday, June 14, 2010
Denim Rosettes
I made these denim rosettes a week or two ago. They are crafted from vintage denim fabric from my mom. They are the biggest rosettes I’ve made so far and I love them! Each one measures approx. 3 1/2” across. I wore one for the first time today for Flag Day.

I had about a half yard of fabric so I was able to make 5 rosettes. I use a 3” strip of fabric per flower. There are tons of tutorials out there but I just ended up kind of making up my own thing. This is a great project because they all turn out so differently and you can’t go wrong.

Close up of one of the finished flowers. This is the one I’m wearing today.

For the back I cut a piece of scrap material into a circle using the bottom of my favorite glass as a guide. I handstitched a pin back into the middle of the circle and then I hand stitched the circle to the back of the flower.
If you’d like to learn how to make one this is what we’ll be making at the etsy craft party I’m hosting this Friday evening.
Monday, May 10, 2010
and then two became one...
 This afternoon I bought these two tshirts.
 close up of neckline before...
 closeup of neckline afterwards...
I love the transformation and can't wait to wear it tomorrow. First I cut off the neck binding, arm hems and bottom hem and then I cut the other tshirt into strips, rolled the strips into roses and sewed them around the front of the neckline. It's like having a necklace and shirt in one! I'd been wanting to try this for a while now and I'm so glad I finally got to it. I'll be tempted to do this to all my shirts now. It was super easy but a bit time consuming with all the hand sewing. Too bad you can't just hot glue them on!
Thursday, April 15, 2010
Fabric Roses Wrist Corsages


I made six more roses this morning so here are the 20 bracelets I have made so far. Individual pictures are posted on facebook. They can be worn separately but it's fun to wear several together. They are $5 each. Each bracelet is completely handmade. I strung all the beads and hand sewed the flowers. The bracelets are all elastic except for the wrap bracelet so they are all adjustable. If you would like any specific measurements for the bracelets let me know. They are all so beautiful they will be hard to part with!
Update 4/15 evening: Added another picture so now there are 25!
Update 4/16: And then there were 30!
Sunday, March 28, 2010
I won!
 I was so excited to receive an email this morning notifying that I had won my friend's giveaway. Technically you were supposed to win something currently listed in one of her stores but since I went over this morning to pick up my prize she said I could choose whatever I wanted and so of course as soon as I saw this beauty I knew this was it! It was like this was made just for me it was so perfect. When I got home I actually did my hair and makeup and picked out an outfit to match. I'm wearing a pink skirt and pink shoes as well. It was so fun to be all dolled up for church. I love it! I'm so lucky to have such an amazingly creative friend and even luckier that I won one of her amazing items. Thanks Jen! Visit her blog and you too will be blown away!
Subscribe to:
Posts (Atom)