Wednesday, February 8, 2012
{Whatever Wednesday} - Contractions
Contractions - that's what has been on my mind today. I've had a lot going on the last three days and increased contractions is one of them. The dr. was shocked how far along I was when he examined me yesterday. I was kind of concerned that labor was eminent but things have subsided now that I'm resting. Glad I don't have anything on my schedule for the next two days so I can rest and let this baby cook a bit longer.

Tuesday, February 7, 2012
{Tutorial Tuesday} - Envelope Template for 4x6 photos
I needed an envelope for some 4x6 invitations that I had printed but I didn't think they existed and even if they did I didn't know where I would go to find some. I figured I would need to make some from scratch. I searched online for a template but the one I found was too tall and not wide enough but at least it was a good starting point. I used it to make a template the right size and enlisted my husband to help me trace them and cut them out. Being tech savvy he thought the whole tracing thing was a bit barbaric so he said he would make me a template so we could print them and then cut them out. This worked out great because then I was able to have him add a decorative edge to the flap and make a couple other modifications. Of course they turned out even better than I imagined and we were able to use up a lot of cardstock that I had on hand. I know I will end up using this a lot. Printing 4x6 pics is way more cost effective than any other size. I figured I should share the template because I'm sure a lot of people could benefit from using it. Here's how I did it:
1. Download the template from here.
2. Print it out. (Note that the side and bottom flaps go off the end so just cut along the marks off the edge of the paper and that will be fine.

3. Cut it out.
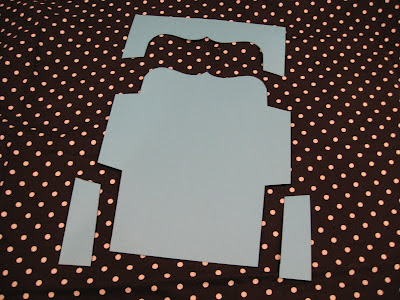
4. Fold in the side flaps.

5. Fold up the bottom flap.

6. Apply some glue to the edges of the bottom flap and hold in place to adhere.
7. After letting the envelope dry a bit, insert 4 x 6 picture and then fold over the top flap and glue in place.

8. Address the envelope and decorate as desired.
I hope this will come in handy for you! Enjoy!


1. Download the template from here.
2. Print it out. (Note that the side and bottom flaps go off the end so just cut along the marks off the edge of the paper and that will be fine.

3. Cut it out.

4. Fold in the side flaps.

5. Fold up the bottom flap.

6. Apply some glue to the edges of the bottom flap and hold in place to adhere.
7. After letting the envelope dry a bit, insert 4 x 6 picture and then fold over the top flap and glue in place.

8. Address the envelope and decorate as desired.
I hope this will come in handy for you! Enjoy!
Monday, February 6, 2012
{Money Saving Monday} - Cen$ible Nutrition Class

I started taking a free Nutrition/Cooking class last Monday and it's so great. Each session starts off with a lesson/lecture and then we make something in the kitchen. Last Monday we made parfaits - so easy and so good and today we made a couple different types of breads and muffins using a starter mix. So smart! I was able to take a peak at the cookbook today and it looks like it's going to be great. I'd pretty much fix everything in there. Most cookbooks are way too out there for me but this one is very practical. I can't wait to get it. The thing is this class lasts 8 weeks and since I've just gone to two classes and I'm due in 4 weeks I'm not sure I'll make it to the end but I'll go to as many classes as I can. There's even a section that talks about making baby food which I'm very interested in.
The first week's lesson introduced us to "the plate" which has now replaced "the pyramid". Makes sense. It's easier to visualize what you should be eating when it is presented like this. I really think they should make actual plates like this to help people eat better and everyone would love it - esp. kids. They could even partition the different areas. Don't kids love plates like that?
I consider myself a middle of the road eater. I never have soda and eat fairly well but there's lots of room for improvement I'm sure. I look forward to continuing the class and putting what I learn to good use. If your area offers a class like this I'd encourage you to take advantage of it. I luckily came across an announcement for it in the local paper. I can't believe that we only have 3 students in the class. You'd think that more people would want to take advantage of this great opportunity.
Friday, February 3, 2012
{Favorite Things Friday} - Texas Roadhouse
{I started writing this post last Friday but didn't get it finished and posted. We actually went to Billings last Thurs. Josh's aunt that was visiting from AZ needed a ride to the airport and since we hadn't been to Billings since the Sat. after Thanksgiving we happily volunteered to take her.}
Since we usually only make it to Billings every month or two we usually treat ourselves to dinner when we go. Texas Roadhouse is where we normally end up. We can't get enough of their rolls and their "early bird" special can't be beat. Since we try to head to Billings as early in the morning as we can we are ready for dinner by the time they open at 4pm. Josh loves to get the chicken fried steak. I opted for the chicken tenders this time. So much food I couldn't eat it all.
 I had to take a picture of Josh's steak since it was in the shape of a heart.
 My leftovers which I thoroughly enjoyed the next day.
Since we usually only make it to Billings every month or two we usually treat ourselves to dinner when we go. Texas Roadhouse is where we normally end up. We can't get enough of their rolls and their "early bird" special can't be beat. Since we try to head to Billings as early in the morning as we can we are ready for dinner by the time they open at 4pm. Josh loves to get the chicken fried steak. I opted for the chicken tenders this time. So much food I couldn't eat it all.


Thursday, February 2, 2012
{Thankful Thursdays} - Selling Crafts
Today I'm grateful that I've been able to make a little extra money here and there over the years by selling some of my handmade creations. Even though I've never really gotten ahead, it seems to even out earnings when they unexpectedly fall behind. I started out many years ago with scarves and have branched out to many different items since then. It's fun to learn new skills and help people out with their gift giving needs. I updated my facebook page with my current inventory of scarves and hats. Since there's going to be six more weeks of winter maybe you need one or know someone who does?

See my current inventory of scarves here.

See my current inventory of hats here.

See my current inventory of scarves here.

See my current inventory of hats here.
Wednesday, February 1, 2012
{Whatever Wednesday} - Winter Crafts
Since I posted some of the Thanksgiving crafts we did at the after school program I thought I'd post a few of the fun projects we've done lately that are winter themed. (Today we actually did a Valentine's craft but I didn't end up with one so I'll have to post about that later.)

The name snowman I saw on pinterest. I traced a juice lid for the snowballs. The kids had fun writing their names and seeing how long they were in comparison to each other. I cut out the hat by hand and had the kids glue them together. The coloring page I found online somewhere. After I had colored it to my satisfaction one of the kids took over and finished it for me. :)

I saw this on pinterest as well. Traced a quarter for the eyes. (Should've brought a circle punch from home.) Just freehanded the rest. We really need to get some left handed scissors. Several of my little kindergartners are left handed and they just can't cut with the right handed scissors we have. The other kids are good about helping them out and atleast they can glue their projects together.

The name snowman I saw on pinterest. I traced a juice lid for the snowballs. The kids had fun writing their names and seeing how long they were in comparison to each other. I cut out the hat by hand and had the kids glue them together. The coloring page I found online somewhere. After I had colored it to my satisfaction one of the kids took over and finished it for me. :)

I saw this on pinterest as well. Traced a quarter for the eyes. (Should've brought a circle punch from home.) Just freehanded the rest. We really need to get some left handed scissors. Several of my little kindergartners are left handed and they just can't cut with the right handed scissors we have. The other kids are good about helping them out and atleast they can glue their projects together.
Tuesday, January 3, 2012
{Tutorial Tuesday} - Crocheted Rag Rug Instructions
Last Tuesday I picked up this queen size sheet at a clothing giveaway. It was faded in spots and had a couple of tiny stains. I've been wanting to crochet up a sheet and thought this would make a great little rug for the baby room.

I really liked the pattern. It looks like a men's dress shirt with the stripes of various shades of blue.

I washed it up and then cut off the casing across the top and the seams along both sides and then I ripped it into 1" strips. As you can see I ended up with quite a big pile of strips.

I then wound the strips up into a ball, attaching the strips as I went. You can either just tie the ends together in a square knot or what I did was cut a slit (like a buttonhole) in the ends of each strip and then lay the new strip on top and pull the other end of the strip through the bottom to hook them together. (There are lots of tutorials showing this)

I didn't take any pictures along the way but here is my completed rug. I wanted it to be about doormat size. The doormat I had on hand was 24" wide x 14 1/2" tall. My rug turned out 27" wide and 14" tall so I came pretty close. This is how I did it: 1. loosely chain 50. 2. turn, chain 1 and sc in each stitch across. 3. keep repeating step 2 till you run out of fabric or your project reaches it's desired size. (I still need to go back over the rug with a smaller hook and pull some of the loose ends under stitches to hid them.)

This is the hook I used which unfortunately has no markings so I'm not really sure what size it is. Also shown is how much of the fabric that I had leftover. I figured I started out with a bit over 230 yards of fabric strips. I'd actually like the rug to be a bit taller so if I can find another sheet that coordinates with this one I'll add a few rows to the top and bottom to enlarge it.
It was a really fun project and I can't wait to crochet up another sheet. Gotta get to a thrift store!


I really liked the pattern. It looks like a men's dress shirt with the stripes of various shades of blue.

I washed it up and then cut off the casing across the top and the seams along both sides and then I ripped it into 1" strips. As you can see I ended up with quite a big pile of strips.

I then wound the strips up into a ball, attaching the strips as I went. You can either just tie the ends together in a square knot or what I did was cut a slit (like a buttonhole) in the ends of each strip and then lay the new strip on top and pull the other end of the strip through the bottom to hook them together. (There are lots of tutorials showing this)

I didn't take any pictures along the way but here is my completed rug. I wanted it to be about doormat size. The doormat I had on hand was 24" wide x 14 1/2" tall. My rug turned out 27" wide and 14" tall so I came pretty close. This is how I did it: 1. loosely chain 50. 2. turn, chain 1 and sc in each stitch across. 3. keep repeating step 2 till you run out of fabric or your project reaches it's desired size. (I still need to go back over the rug with a smaller hook and pull some of the loose ends under stitches to hid them.)

This is the hook I used which unfortunately has no markings so I'm not really sure what size it is. Also shown is how much of the fabric that I had leftover. I figured I started out with a bit over 230 yards of fabric strips. I'd actually like the rug to be a bit taller so if I can find another sheet that coordinates with this one I'll add a few rows to the top and bottom to enlarge it.
It was a really fun project and I can't wait to crochet up another sheet. Gotta get to a thrift store!
Subscribe to:
Posts (Atom)